• Cookies1

    The first summer weekend – it feels impossibly new and yet so familiar all over again. Empty avenues, packed parks, the scent of a hundred backyard barbecues wafting through the city. We did our patriotic duty and had our own barbecue this weekend – with a dubious grill that needs a scrubbing like nobody's business, I might add. While others took care of the hamburgers and grilled corn and salads, I busied myself with dessert. It might have been insanity to turn the oven on on the first weekend of summer, but with the kind of recipe challenge I had in front of me, could you blame me? Hardly.

    Back in January, Amanda Hesser printed three recipes for chocolate-chip cookies in the New York Times Magazine. She had covered what arguably might be called the three "Schools of Chocolate-Chip Cookiedom": Thin-and-Crisp, Flat-and-Chewy, and Thick-and-Gooey. Along with the recipes came an admonition and a plea: "I'm sure that there are least five subschools that I've missed, and you can let me know about them. These recipes were each tested more than a half-dozen times, so please grant us some generosity". I must admit that I felt like I was being spoken to directly. A glove was thrown! I would have to accept.

    I chose Flat-and-Chewy for my Saturday night barbecue, for no real reason, really. The batter came together swiftly, as cookie batter usually does. I stumbled over only one thing: the entire tablespoon of kosher salt called for. Ben watches his sodium, and I've become a bit of a watchdog on this matter, so I cut down the salt to a single teaspoon. I did think that I'd need to adjust the baking soda as a result, but I didn't know how to regulate the proportion and so I just let it go, keeping the same amount of soda despite getting rid of most of the salt. The cookies baked up just as promised – flat and chewy and with that glorious age-old cookie scent that no one ever tires of.

    In our group of seven testers, everyone raved over the smell and taste. Ben found them too salty – but still managed to eat several and blissfully at that, while everyone else liked the occasional kick of salt (though I really cannot imagine what these would have tasted like with an entire tablespoon. And I'm not trying to be ungenerous here!) and the way it brought out the caramel tones of the brown sugar and chocolate. As I chewed contentedly on a cookie, though, I found it slightly bitter. Was it the chocolate (by the way, I used Ghirardelli chips instead of block chocolate)? No…I realized it was the baking soda. I don't really know if I could have gotten rid of the bitterness by using less soda or by using more salt. I'll have to go pore over Mcgee or Corriher to find out, I suppose.

    Lest Amanda thinks (you like how I assume that she might be reading this?) that this is a critical post, I should note that all but four cookies were gone an hour after they emerged from the oven (one of our dinner guests even said she loved the bitter soda taste). We happily ate the remaining ones for breakfast the next day. I can't wait to try the other recipes (Thick-and-Gooey is next, I think). But the truth is that at the end of the day, if you asked me what my favorite chocolate-chip cookie recipe was, I'd still say it was Debbie's.

    Flat-and-Chewy Chocolate Chip Cookies
    Makes 30 cookies

    2 cups all-purpose flour
    1 1/4 teaspoons of baking soda
    1 tablespoon kosher salt
    8 ounces butter, softened
    1 1/2 cups packed light brown sugar
    1/4 cup sugar
    2 eggs
    1 tablespoon vanilla extract
    2 cups chopped bittersweet chocolate (chunks and shavings)
    2 cups chopped toasted walnuts (optional)

    1. Line two baking sheets with parchment paper or Silpat. Sift together the flour, baking soda and salt.

    2. Cream the butter and sugars together until fluffy, about 3 minutes. Add the eggs, one at a time, then the vanilla. Add the flour mixture all at once and blend until a dough forms. Fold in the chocolate and nuts, if using. Chill the dough.

    3. While the dough chills, preheat the oven to 325 degrees. Roll 2 1/2 tablespoon lumps of dough into balls, then place on baking sheet and flatten to 1/2-inch-thick discs spaced 2 inches apart. Bake until the edges are golden brown, 14 to 16 minutes. Let cool slightly on the baking sheet, then transfer to a baking rack.

  • Bread_pudding_2

    I am of the school that finds bread pudding to be one of the world's most perfect desserts (since you can also eat it for breakfast or as a midnight snack and don't we all know that that kind of versatility is what makes a dessert an Important Dessert?). Stale bread, light custard, a few flavorings: this is nursery food at its best. And this bread pudding might be one of the most delicious things I've ever eaten. It doesn't necessarily photograph well to show off its full splendor, but it is Out Of This World. I made it to follow our slightly ascetic meal of vegetable soup the other day, which was smart thinking, because I was able to eat an entire plate (dessert plate, but still) of the stuff, quite unencumbered and happily indeed.

    If Simone Beck's name seems familiar to you, it's because it has for decades followed the more famous name on the spine of Mastering the Art of French Cooking. Julia Child befriended Simone Beck along with Louisette Bertholle when she lived in Paris as a young woman. Together these ladies founded a cooking school and then went to be immortalized on kitchen shelves everywhere. Simone Beck wrote a book of her own in the early 80's, and it was from this book that Amy Scattergood pulled the bread pudding recipe published in an article on dried fruit in the LA Times in February.

    There are a few amendments I have to make to that recipe, the most important being to cut the sugar in half because good God, I can't imagine the sweetness if I had used the entire cup. And I have a sweet tooth, people. So, I cut the sugar in half, totally forgot about the cinnamon and added an ounce of bittersweet chocolate that I'd chopped into a pile of shavings and rubble (because nothing – but nothing – makes prunes more delicious than a little bit of chocolate. Or?).

    Thanks to Balducci's on 8th Avenue, I used dried Blenheim apricots instead of the regular Turkish ones, and I tell you, they may be the very things that transport you straight to heaven. Their cost is proportional to their incandescent taste, but it's money well-spent, especially since we good-fruit-starved East Coasters have to go to extreme measures to acquaint ourselves with the kind of produce those darn Californians can enjoy by just going down to the farmer's market. One last thing: if you make this, do yourself and your guests a favor and chop those pitted prunes up a bit. Left whole, they overwhelm each serving. The apricots do a better job of melding into the fabric of the pudding.

    Served fresh and warm, the pudding was creamy, tender, resplendent with flavors and textures. Aromatic orange peel, rich chocolate tones, barely-there custard with supple bread suspended amongst the soft, zesty apricots and moist prunes. The few almonds on top added texture to the glorious spoonfood below. Eaten chilled the next day, the pudding had firmed up a bit, but the deliciousness was in no way diminished. The flavor almost reminded me of Panettone eaten on holidays, but it was even better that that – richer, fruitier, creamier. Perfection.

    Bread Pudding with Prunes and Apricots
    Serves 6

    1/2 pound pitted prunes
    4 ounces dried apricots
    1 cup good red wine or strong tea (I used tea)
    1 teaspoon cinnamon (I left this out)
    4 ounces fresh white sandwich bread, crust removed, and broken into small pieces
    2/3 cup milk
    1 cup sugar (I used 1/2 cup)
    4 tablespoons unsalted butter, cut into pieces
    Finely grated zest of 1 orange
    3 eggs, lightly beaten
    3 tablespoons dark rum (optional – I used 1 1/2 tablespoons)
    1/4 cup sliced almonds

    1. To plump the prunes and apricots, place them in a medium saucepan with the wine or tea and cinnamon. Cover and simmer until the fruit is very tender and has absorbed most of the liquid, about 15 to 20 minutes.

    2. Soak the bread briefly in the milk, then add it to the pan, off heat, along with the sugar, butter, orange zest, eggs and rum, if using. Stir gently to combine.

    3. Turn the mixture into a well-buttered 1 1/2-quart Pyrex casserole or a medium-size oval gratin dish and bake in a 375-degree oven for 15 minutes.

    4. Sprinkle on the sliced almonds and continue baking for another 15 minutes, or until the pudding is firm and the almonds are nicely browned. Allow to cool slightly before serving.

  • Cheese

    Would you like to know what disaster looks like? This is what disaster looks like.

    Those shredded bits of feta and herbs were meant to bake up into crispy brown rounds to be nibbled on with a glass of wine as an appetizer at an easy Sunday dinner last night in Queens. Instead, I found myself gingerly lifting liquefied blobs of cheese off my baking sheet with a metal spatula yesterday afternoon and breaking out in an angry sweat when I realized that I'd have to trash the entire lot. All of it – the greasy, sweaty, herbed-up cheese – got dumped into the bin.

    So much for the Feta Cheese Crisps expounded on by none other than Greek cooking authority Diane Kochilas in a New York Times article about that famous cheese. Kochilas got the recipe from Doherty, a chef in Philadelphia who is developing a "Greek-inspired" restaurant there. I can only hope that the Feta Crisps won't be featured on the menu, or that perhaps some recipe testing is included in the development of that restaurant.

    You're supposed to pulse together rinsed and drained feta with some grated pecorino, thyme, oregano, nutmeg and black pepper and then drop spoonfuls of this mixture onto a baking sheet. The cheese dollops are baked at 400 degrees for 10 minutes, or until golden brown. You're then supposed to transfer the crisps to a wire rack to cool. I assume Doherty hoped his crisps would be a Greek version of the Italian frico, but I really have to wonder if he thought that simply substituting feta for Parmigiano would actually work despite its much wetter, softer consistency.

    Luckily for me, I made the recent discovery of a delicious cheese called Crucolo (if you can buy this where you live, do so, please) and was able to proffer this to my hosts instead. Our meal of tuna steaks in a lovely ginger sauce followed by an incredible plum tart (a square of puff pastry covered with shredded almond paste and halved plums filled with mascarpone and dusted with cinnamon) all but made up for the earlier kitchen indignity. But still. Didn't anybody try to make this before it got published in the Times?

  • Soup_9

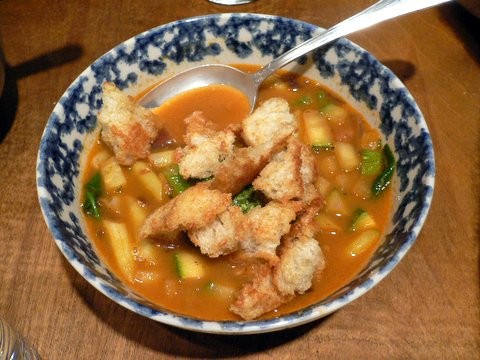
    After all that cooking and praising I did of Suzanne Goin’s delicious recipes, I’m now the proud owner of her cookbook. I leaf through it from time to time, stopping to gaze at her gorgeously written recipes and beautifully-staged photographs, and I daydream about having enough time to cook everything in it. When I was given the book (thank you, Farah!), I threw out my newspaper clippings of her recipes. Well, all but one. The LA Times had written about Goin’s soupe au pistou in their Culinary SOS column, but the recipe wasn’t in the book. A simple Google search turned up the tidbit that Goin had found the recipe too difficult to adapt for just 6 people (the amount all of her recipes in the book serve).

    Odd, because the LA Times’ version of the recipe was for 6 to 8 servings (and in fact, it ended up serving only three of us last night – but when one of us is Ben, you can figure he can fit at least two or three servings under his 6 foot 5 inch belt). In any case, I was excited to try out a Goin recipe that had been published in the paper but not in her book, and got to work last night for dinner. The first thing I have to say about it is that it takes FAR longer than the recipe indicated it would (1 hour and 20 minutes). As Goin is wont to do, the soupe is made up of several different components, each of which took their good old time to be done. Making the soupe took me close to two hours.

    I chopped and sauteed and stirred constantly and caramelized and blended and strained and sauteed yet again and chopped and sauteed one more time and brought to a boil and tossed and toasted. The house filled with incredible aromas: especially while making the initial broth. That part of the recipe is fantastic – it creates a deeply flavored, multi-layered broth that would be delicious as vegetable stock to make risotto with, or to simmer pastina in, or to add a medley of chopped vegetables to for a vegetarian soup that has a complexity of flavors heretofore unknown to most vegetable soups. Topping the soup with fragrant and crusty homemade croutons was a lovely touch as well (in fact, we could have nibbled on the croutons, sans soupe, quite happily, all night).

    But something mucked the whole thing up, at least for me. Since my run-in with Giada’s spinached version of pesto, I can’t face the original stuff without my tummy doing somersaults. And I didn’t realize this last night, after I dolloped our soup bowls with the pistou and sunk my spoon into the broth. Ben and Becca tucked in happily, but I found that the hard work of coaxing out all the myriad flavors in the broth and the varieties of lovely vegetables chopped and sauteed individually for the soupe was eclipsed by the strong flavors of the basil pistou. Why mask all of that vegetal goodness with the (comparatively) harsh pesto? Luckily Ben was happy to finish off my portion, and I nibbled on some cheese instead. But still, disappointment reigned supreme.

    I did allow myself a few shortcuts (making the pistou in a mini food-processor, using canned beans instead of fresh; throwing the cut green beans into the strained soup to boil for a few minutes instead of blanching and cooling them in salted water). For your sanity’s sake, I’d advise you to do the same. And I’d advise you not to put the pistou on the soupe and just enjoy the soupe alone with its hyper-flavored intensity. I realize that naming your unpistoued soupe a soupe au pistou sort of sounds ridiculous (as does that sentence), but trust me, it’ll taste better, clearer, more interesting, without it.

    Soupe au Pistou with Parmesan Croutons
    Serves 6

    Broth:
    3 tablespoons olive oil
    1/2 sprig rosemary
    1/2 dried chile de arbol
    1 cup roughly chopped onion
    1/4 bulb fennel, roughly chopped (about 1/4 cup)
    1/2 cup roughly chopped carrot
    1/3 cup roughly chopped celery
    3 cloves garlic, unpeeled
    5 sprigs thyme
    3 sprigs Italian parsley
    1 bay leaf
    1 teaspoon fennel seeds
    1/2 teaspoon black peppercorns
    1 tablespoon kosher salt (I only used 1 teaspoon)
    1 cup chopped canned San Marzano tomatoes (about 4)
    2 quarts water

    1. Heat a large heavy-bottomed pot over high heat for 2 minutes. Add the olive oil, rosemary and chile. When the rosemary and chile start to sizzle, add the onion, fennel, carrot, celery, garlic, thyme, parsley, bay leaf, fennel seeds, peppercorns and salt.

    2. Saute the vegetables for 8 to 10 minutes, stirring often, until they begin to caramelize. Add the tomatoes and cook for 5 minutes.

    3. Add the water, bring to a boil and simmer until the vegetables are soft, about 10 minutes. Cool slightly, then puree in a blender, in batches if necessary. Strain. Cool completely.

    Pistou
    1/2 clove garlic
    1/2 teaspoon kosher salt
    1 cup thinly sliced basil
    3/4 cup olive oil
    1/2 cup chopped parsley
    3 tablespoons toasted pine nuts

    1. Pound the garlic in a mortar with the salt until it forms a paste. Place in a small mixing bowl. In batches, pound the basil to a paste, transferring the paste to the bowl as you go.

    2. Stir the olive oil into the basil. When the basil has all been incorporated, pound the parsley in the same manner and add to the bowl. Gently pound the pine nuts and add to the bowl. Stir; taste for seasoning.

    Soup and assembly
    6 tablespoons olive oil, divided
    3/4 cup diced red onion
    3/4 cup diced fennel bulb
    1 teaspoon thyme leaves
    1/2 teaspoon kosher salt
    Dash pepper
    1 1/2 cups diced zucchini
    1 1/2 cups 1-inch bais cut mixture of green and yellow beans
    1/2 cup cooked fresh shelled beans (flageolet or cranberry)
    1/4 pound country white bread
    1/4 cup grated Parmigiano
    1 cup baby spinach leaves
    1 recipe pistou

    1. Heat the oven to 350 degrees. Heat a medium saute pan over high heat for 1 minutes. Add 2 tablespoons olive oil and the onion. Cook until the onion is translucent. Add the fennel, thyme leaves, salt and pepper. Cook until the fennel is tender, 1 to 2 minutes. Remove to a plate and cool.

    2. Return the pan to the stove, add 2 tablespoons olive oil and quickly saute the squash over high heat for 1 to 2 minutes. Remove to a plate to cool. Blanch the cut beans for 2 minutes in boiling salted water. Cool in an ice bath. When the vegetables have cooled, add them to the soup. Add the shell beans; taste for seasoning.

    3. Cut the crust from the bread and tear the remaining bread into rustic 1-inch pieces. Using your hands, toss with the remaining 2 tablespoons olive oil and the Parmigiano, squeezing the bread gently to help it absorb the oil. Arrange the croutons in a single layer on a baking sheet and toast, stirring often, 12 to 15 minutes, until golden brown and crisp outside, but a little tender inside.

    4. Heat the soup to boiling. Stir in the baby spinach. Ladle the soup into bowls and garnish each with a spoonful of pistou and a handful of croutons.

  • Readers of this blog know that when scones show up on the screen here, it's because I've made another batch for Ben. He's an avid breakfast pastry fan – and because I'm totally retro, I try to keep his freezer stocked, because don't we all know that the way to a man's heart is through his stomach? The Settlement Cookbook taught me well. When I had the maple-pecan muffin bake-off a few weeks ago, I planned on giving Ben the muffins (well, after having taste-tested one – or two – myself). But little nibbly bunnies (aka roommates) got in the way and ate up most of the entire bag before I could so.

    So when I saw a recipe for maple scones in the New  York Times (and decided to substitute pecans for the walnuts called for), I figured I had no choice but to make them. Besides, the recipe provenance had a special significance. Though I met Ben in New York only a few years ago, we actually went to school together for a short time in a suburb of Boston, and the Samuel Sewall Inn, whose recipe accompanied an article on the maple syrup harvest, is in that same town. Ben and I were on opposite ends of the social strata in 7th grade: he was the popular, trouble-making newcomer, I was the painfully shy loner. It's no wonder we never even met. It's been an amazing experience in human growth to get to know and love him years later. Though it took me a while to realize just how special Ben is, I'm making up for my slow learning curve by baking my way further into his heart.

    These scones have an incredible aroma – now totally familiar to my kitchen – of toasty pecans and warm maple flavor. The whole wheat flour adds a substiantial bite (and to make them even healthier, you could substitute cooked wheat berries for the nuts). The scones really are best eaten warm – if you can't serve them right away, heat them up in the oven before you do. And I promise that for the next few months, I'll stay away from the maple-pecan combination (after all, it's spring! Time for berries and joy!). But while rain and gray skies still threaten our city, we're curling up together to munch our breakfast with milky tea and I'm reveling in my good fortune to have landed such a scone-loving sweetheart.

    Maple Scones
    Yields 8 scones

    1 cup whole wheat flour
    1 cup white flour
    2 tablespoons packed brown sugar
    2 teaspoons baking powder
    1/4 teaspoon salt
    1 stick of butter
    1/2 cup chopped toasted walnuts or pecans
    1/3 cup maple syrup
    1 large egg
    2 tablespoons milk or as needed

    1. Heat oven to 400 degrees. In a large bowl, combine both flours, brown sugar, baking powder and salt. Using a pastry blender, or two knives scissor-fashion, cut butter into flour mixture until it resembles fine crumbs.

    2. Add nuts. Stir in the maple syrup and egg and just enough milk so that dough leaves side of bowl and forms a ball. Turn dough onto Silpat-lined baking sheet and pat (with floured hands) into an 8-inch disk; cut into wedges, but do not separate.

    3. Bake until golden brown, about 25 minutes. Immediately remove from baking sheet and carefully separate. Serve warm.

  • Biscotto

    I'm not partial to cookies that look like their creator suffered an attack of ADD whilst putting them together: stuffed to the gills with all sorts of nuts and chips and nuggets and chews. Maybe it's why I've never wanted chopped nuts sullying my chocolate chip cookies (or brownies, for that matter), or feeling overwhelmed when attempting to eat and actually taste the competing flavors and textures in this much-lauded creation (which actually IS pretty good – but I made a batch only once and for a long-ago boyfriend, shortly before we parted ways. And now that cookie is now pretty much off-limits for my kitchen ever again. You know?).

    So when I set out to make these biscotti (courtesy of an LA Times piece in the 2001 holiday season about home-made presents), I already had a bit of a prejudice going. To add insult to injury, I was instructed to fashion the dough into logs, slice them, and (under)bake these up into biscotti – chewy biscotti, at that. Now I hate to get all high-and-mighty about cookies, for crying out loud, but biscotti (snappy and crisp) are an entirely different animal than just cookie dough shaped into logs and twice-baked. Especially (totally dry) cookie dough that is so chockful of ingredients that shaping it into a cohesive log is an exercise in utter futility.

    This particular dough would have worked so nicely just rolled into small balls, dipped in sugar and baked up into simple rounds. If you feel a hankering for these cookies, take my advice, I beg of you, and go this route. Otherwise, you will find yourself standing over your Silpat-lined cookie sheet, chanting incantations at the over-stuffed cookie dough and willing it to stay stuck together as you massage it into pliancy. Then, when you've somehow managed that (nigh)impossible feat, you'll be wielding a serrated knife like a banshee gone berserk, doing your best to slice the half-baked logs into neat little shapes without them crumbling all over creation and having your precious ingredients spill out like the innards of a slaughtered pig (did I go too far? I think I might have).

    But after all that bitching and moaning and self-righteous muttering, these cookies were actually quite nice. Although the cookies looked monstrous – with dark cherries bulging indecently out of the sides – the amiable aroma of molasses and spices had strangers coming up to me in the post office (of all places) to ask about them, and the eyes of my hostess at dinner last night widened sweetly when she saw what I'd brought her. I substituted sliced almonds for the hazelnuts, because they go better with spice cookies studded with translucent cubes of candied ginger, and I let the biscotti dry out a bit in the oven for a crunchier result.

    I still think I'll stick to my simpler cookie tastes, in which only one ingredient has the starring role, but these gussied-up, role-playing "biscotti" really weren't half bad. I kind of wish I hadn't given them all away.

    Ginger-Sour Cherry Biscotti
    Makes 24

    1/3 cup oil
    1/4 cup dark molasses
    1 cup sugar
    1 egg
    2 cups flour
    1 teaspoon baking soda
    1/2 teaspoon ground ginger
    1 teaspoon ground cloves
    1 teaspoon ground cinnamon
    1/2 teaspoon salt
    1 cup chopped peeled hazelnuts
    1 cup dried sour cherries
    1/2 cup minced crystallized ginger

    1. Heat the oven to 350 degrees. Beat together the oil, molasses, sugar and egg.

    2. In a separate bowl, combine the flour, baking soda, ginger, cloves, cinnamon and salt. Stir in the dry ingredients into the wet. Stir in the nuts, cherries and crystallized ginger.

    3. Divide the dough in half and form each half into a log about 12 inches long and 2 inches wide. Press down on the dough to flatten slightly. Place the logs on a nonstick cookie sheet and bake for 15 minutes.

    4. Cool the logs for 5 minutes, then cut them on the diagonal with a serrated knife into 3/4-inch thick slices. Lay the biscotti on their sides (on two baking sheets) and bake until they are still somewhat soft to the touch but dry, another 15 minutes. If you want crisper biscotti, leave them in a bit longer.

    5. Transfer the biscotti to a wire rack to cool. Store in an airtight container.

  • P1030163

    After a long weekend of excess (crab cakes, scrapple *gasp*, and Hershey kisses at the beach with dear friends; a four-course 30th birthday dinner capped off by chocolate cake from Billy's; croque madame and attitude for Sunday brunch followed by bottles of beer and our first run of Ben's backyard grill on Sunday afternoon… are you feeling ill yet? I know I am), I was in dire need of a healthy meal to reassure me that I wasn't about to die of a coronary at the ripe old age of 28. I scoured my binders for something to fit the bill.

    Sometimes a recipe comes along that is just what it seems: straightforward to prepare, reasonably healthy, and tasty to boot. There isn't much to say about recipes like that, and I often ignore them on the blog, in favor of food that packs a bigger punch. But it isn't fair to those simpler recipes, and I often find that people in search of easy cooking are partial to that kind of food anyway. Luckily for me, the recipe I chose to make was all of the above, and just the ticket for dinner.

    The LA Times reviewed Diane Morgan's Thanksgiving cookbook several years ago, and excerpted a few of her recipes in the paper, including one for a gratin of fennel and tomatoes. Although this is apparently meant to be a holiday dish, I found it just as delicious in spring (though I do see how perfect it would taste alongside a roasted bird and a few dozen other dishes). It's quite flavorful, but the cooked fennel is creamier and less aggressive than its raw version. Combined with the tomatoes and onions and garlic, it melds into a soothing, yet healthy dish.

    One change I'd make is to toast the breadcrumbs in some olive oil or butter so that when the gratin bakes in the oven, the topping crisps up instead of staying dusty and dry. Eating a plateful of this for dinner with a slice of bread made me (and my arteries) feel right as rain.

    Gratin of Fennel and Tomato
    Serves 10 as a side dish

    3/4 cup dried bread crumbs
    5 tablespoons olive oil
    3 cloves garlic, minced
    1 large onion, halved and cut in 1/4-inch slices
    6 fennel bulbs, trimmed of stalks, halved, cored and cut in 1/4-inch slices
    1 (28-ounce) can of diced tomatoes, drained
    1 teaspoon salt
    Freshly ground pepper
    3/4 cup (3 ounces) grated Parmigiano
    Grated zest of 1 lemon

    1. Preheat oven to 425 degrees. Toast the breadcrumbs in an 8-inch skillet over medium-high heat, stirring constantly, until golden brown, about 2 minutes. Set aside to cool.

    2. Heat the onion in a very large (16-inch) skillet over medium heat, and swirl to coat the pan. Cook the garlic and onion until soft, but not brown, about 5 to 6 minutes. Add the fennel and continue cooking, stirring frequently, until the fennel has softened and is beginning to brown, about 20 to 25 minutes.

    3. Add the tomatoes, salt and pepper to taste. Reduce the heat to medium-low and cook, stirring frequently, for 5 minutes longer. Transfer to a shallow 3-quart oven-to-table casserole or gratin dish.

    4. Combine the breadcrumbs, grated cheese and lemon zest in a bowl and sprinkle evenly over the fennel mixture. The gratin can be made up to this point 6 to 8 hours ahead. Cover and refrigerate, then bring to room temperature before baking.

    5. Bake the gratin until heated through and the topping is crisp, about 20 minutes. Serve immediately.

  • Fideua_1

    Ben's sister's boyfriend is a Spanish talent in the kitchen and he was the first one to introduce me to fideua, utter heaven if you love pasta and paella equally and don't know which to make for dinner. When I found a clipping for fideua in my recipe binders last night after work, I wanted nothing more than that for dinner. Little did I know what lay in store for me. For that Mark Bittman is a sneaky, sneaky fellow. I know I swore up and down I wouldn't cook anything of his again. After all, it was easy to go through my newspaper clippings and toss out all the ones headed with "The Minimalist". But I had forgotten about the recipes of his printed out in Word documents and filed in binders. In some cases, I forgot to note who they came from, and there they lurked, biding their time, until I came along and unwittingly snatched one up for suppertime. Curses!

    I suppose I could have guessed, half-way through the cooking process last night, that something was amiss. I had short lengths of angel hair pasta scattered all around the recently cleaned kitchen: the floor, the stove, the countertops were covered. My brow was shiny with sweat and I kept snapping at Ben every time he tried to come close and help. The 12-inch pan called for in the recipe, to fit 1 pound of short pasta, was an absolute joke: every time I tried to stir the browning pasta, more of it ended up on unwanted surfaces. I came dangerously close to abandoning the recipe entirely, though in my wild-eyed state of hypoglycemia, I was still lucid enough to realize that might not be the best solution.

    Instead, I dumped out a quarter of the pasta, turned my back on the gathering mess around me, and went to work, teeth gritted and all. I added saffron, sweet paprika and minced garlic to the toasted pasta in the pan and attempted to stir this altogether. Though more chaos in the kitchen ensued, I tried to focus on the dulcet tones of the Colbert Report emanating from the living room. I added clams and mussels and some water to the pan, and attempted to stir this. I kept trying to stir and adding more water to keep the pasta from burning for about 10 minutes, until the pasta seemed tender and the mollusks started opening. Then I added shrimps and scallops, and kept the heat on a few minutes longer to cook them through, before stirring in chopped parsley and turning off the stove.

    We ate our fideua on the couch, plates balanced on our knees (it was too late for polite dinner conversation at the table), squeezing lemon over the seafood and chewing contentedly in silence. Because you know? It was pretty good. Those Spaniards know what they're doing with the saffron and the seafood and the deliciousness that ensues. If only the recipe transcriber, AHEM, could have done a better job of telling me to use less pasta to fit in the pan. But that's what I'm here for, to pass on my hard-won information to you. Despite throwing out a quarter of the pasta, I kept the seasonings and liquids called for. So if you do make this with the entire pound of pasta, you need to up the amounts of garlic and spices and stock. And be prepared to be on your hands and knees mopping the kitchen floor while you mutter angrily to yourself and your boyfriend wonders, safely in the other room, where his lovely girlfriend disappeared to.

    Fideua (Spanish Pasta with Seafood)
    Serves 4

    4 tablespoons olive oil
    1 pound fideo or very thin pasta, in 2-inch lengths or shorter
    salt and pepper
    1/2 teaspoon saffron threads
    1 teaspoon sweet paprika
    1 tablespoon minced garlic
    1 pound cockles or small clams, well washed
    1 pound mussels, well washed
    1/2 cup stock or water
    8 to 12 large shrimp, shells on
    4 to 8 sea scallops, cut in half through their equators
    1/2 cup chopped fresh parsley leaves
    Lemon wedges

    1. Put oil in a skillet at least 12 inches across (I used this, which wasn't nearly big enough. I'd say you should use the 14-inch version or else this), and turn heat to medium-high. A minute later add noodles; sprinkle with salt and pepper, and cook, stirring almost constantly, until they darken. Try to avoid letting more than a few pieces blacken.

    2. Add saffron, paprika and garlic, and stir for a minute more. Add clams and mussles and about 1/2 cup water or stock and continue to cook, stirring. Depending on how much liquid the clams and mussels release, you may have to add a little more liquid. Continue to cook and stir until the pasta is nearly tender, about 10 minutes.

    3. Add shrimp and scallops and cook about 5 minutes, stirring occasionally, until cooked through. Stir in parsley, taste and adjust seasoning and serve with lemon wedges

  •  

    P1030044_1

    Run, don't walk, to your local fishmonger today and buy two pounds of mussels, stat. Because I seem to be on some kind of a roll again here, and we have to take advantage of moments like this, of recipes proffered from newspapers that turn out to be recipes you will love and treasure and make over and over again. With this one, I know I will. It's labeled a soup, but I'd venture to say this is really more a stewy bowl of broth-moistened bread with all sorts of delicious things sloshing around in there. The recipe comes from Daniel Young's new book, The Bistros, Brasseries and Wine Bars of Paris that was reviewed in the LA Times. Although Young's subject is as old as the hills, this recipe alone is worth the price of the book.

    I have the good fortune of having the world's best fishmonger working just a few blocks from my office. He's French and knows his metier in the way only a Frenchman can, which, I'm sure I don't need to tell you, is a relief after having stood in front of one too many other fish counters with fishmongers who don't know the difference between halibut and cod. In the 2-pound sack of mussels he gave me, there was only one mussel that didn't open in the cooking process… I'd say that's pretty great quality. And the flavor? Sweet, tender, delicious. Plus, I just get a kick out of him in general: "yes-euh, no problem-euh".

    But we were talking about the recipe here: it's easy as pie. You dump your cleaned mussels in a heavy pot (I used my cast-iron one) with a cup of water and a cup of wine and bring it all to a boil to steam open the mussels for a few minutes. You drain off the mussels and save that milky, fragrant liquor. Then you saute a panful of chopped garlic, add the mussel juice and simmer it together before adding in a slurry of beaten egg yolk and vinegar. You layer toasted baguette slices, shucked mussels, and a bit of grated cheese in a bowl before pouring over the frothy broth that softens the bread and melts the cheese and bathes the mussels with gorgeous flavors.

    To gild the lily, you could dust piment d'Espelette on top, or do as I did and not. I'd say the recipe makes four dainty servings – it's not a lumberjack's meal. But it's so satisfying that you won't need much more than a sharply dressed salad to follow it for a very successful dinner. I'd rather have this than moules frites any day of the week.

    Garlic Soup with Mussels
    Serves 4

    2 pounds mussels, scrubbed and debearded
    1 cup dry white wine
    3 tablespoons olive oil
    6 garlic cloves, minced
    1 baguette, cut into 12 (half-inch) slices
    1 egg yolk
    1 tablespoon red wine vinegar
    1 cup (4 ounces) grated Gruyere
    1 to 2 teaspoons piment d'Espelette or chili powder – optional

    1. Place the mussels, wine and 1 cup of cold water in a large saucepan over moderately high heat. Cover and cook until the shells open, 4 to 6 minutes. Strain the mussels into a colander, collecting the juices in a bowl placed below.

    2. Heat the olive oil in a saucepan over low heat, add the garlic, and cook, stirring constantly, until pale gold, 3 to 4 minutes. Do not let brown.

    3. Add the mussel juice to the garlic, raise the heat to medium and bring to a boil. Cover, lower the heat to very low, and simmer for 10 minutes.

    4. Meanwhile, remove the mussels from the shells. Lightly toast the bread.

    5. Remove the soup from the heat. Combine the egg yolk, vinegar and a couple tablespoons of the soup in a mixing bowl and beat vigorously with a whisk until the mixture gets foamy. Slowly pour the mixture back into the remaining soup, continuing to beat with a whisk.

    6. To serve, place a few baguette slices, 3 to 4 tablespoons of grated cheese and some mussels on the bottom of 4 wide soup bowls, cover with soup and dust with piment d'Espelette.

  • Crostini

    It's been a while since I've made a Russ Parsons recipe. Because if all I ever did was write about slam-dunk recipes, you'd all be snoring your way through this blog. Or maybe that'd just be me? Either way, Russ knows his recipes. Whether he's having you puree boiled greens with cooked rice to make a delicate soup, or steam potatoes to serve under an aromatic and earthy hash of mushrooms, Russ brings you Seriously Good Food. So it was no surprise to me that his latest recipe was yet another smash hit.

    In last week's LA Times, Russ wrote about burrata – an Apulian knot of mozzarella filled with rags of molten cheese and cream. In Italy, it's difficult to find burrata outside of the small region that produces it (I have some family in a town in that region and have had the most distinct pleasure of eating burrata there. It's quite the gustatory experience, and totally decadent, especially for someone raised by people with more ascetic, Lutheran sensibilities. Have you ever heard of anyone eating cream-filled cheese in northern Europe?), but of course California being California, Russ tracked down an Italian immigrant running a healthy business producing burrata in Los Angeles.

    And that is great news for all of us. Because if Russ hadn't tracked down the burrata maker, he wouldn't have printed a recipe for toasted bread with sauteed radicchio topped with a dollop of cream and cheese, and we'd all be the poorer for it. I had friends coming over for dinner on Friday, and figured I'd start our dinner with a tray of these crostini passed around. After all, a weekend that started with these crostini could be a very good weekend, indeed (and it was. Dinner with friends! A Spike Lee Joint! Brooklyn Real Estate Hunting! A Blogger Meet-up!). In New York, it's not too difficult to find burrata – it gets flown in from Italy and is sold at Garden of Eden, Zabar's and Buon Italia, to name a few stores.

    The radicchio marmalade was a cinch: nothing more than a hot panful of sliced radicchio cooked down with garlic cloves, oil, salt and balsamic vinegar. While that cooked, I sliced baguette rounds and toasted them. Each round got a spoonful of radicchio and a gently torn-apart piece of burrata, taking care to include both outer layer and filling. I forgot both the oil drizzling and pepper cracking on top, and still my guests and I couldn't stop eating the crostini. Crunchy bread with silky, pungent radicchio, capped with softly unctuous cheese that was fresh and barely sour: this bruschetta was delicious beyond words. And though it was utterly original and different, it tasted just like Italy.

    Since I halved the recipe, I had leftover burrata to contend with. It was pretty easy getting rid of it. Some got eaten cold from the fridge with a fork the next day, after I'd spent seven hard hours baking bread with the big league and needed something – anything – to keep me alive. The rest of it I chopped up fine and dumped into a bowl of hot pasta with barely cooked tomatoes in basil oil for lunch today – the residual heat from the pasta and sauce melted the burrata, which in turn coated the spaghetti strands with creamy, wonderful flavor. Not a bad way to start the week off, either.

    Bruschetta with Burrata and Radicchio Marmalade

    Serves 8

    1 pound radicchio, preferably di Treviso
    4 tablespoons olive oil, divided
    5 whole garlic cloves, peeled
    1/2 teaspoon salt
    1 tablespoon balsamic vinegar
    1 baguette
    1/2 pound burrata
    Freshly ground black pepper

    1. Trim ends, then cut each head of radicchio into lengthwise quarters and then into cross-wise ribbons about 1/4-inch wide. Combine the radicchio in a cold skillet with 3 tablespoons of olive oil, garlic, salt and balsamic vinegar. Cover and cook over medium-low heat, stirring occasionally, until the radicchio has softened, about 10 minutes.

    2. Reduce the heat to low and cook until the radicchio is quite soft and the bitterness has cooked out, about 5 minutes more. Season to taste with salt and perhaps just a little more balsamic vinegar. Remove from heat and set aside. Remove the garlic before serving.

    3. Slice the baguette into half-inch slices and toast until lightly browned on both sides.

    4. Spoon a heaping tablespoon of radicchio marmalade onto each slice of bread and top with a similarly sized spoonful of burrata (try to get both the filling and the wrapping in each spoonful). Sprinkle each with a light grinding of black pepper and a drizzle of the remaining olive oil and serve.