• P1110039

    The wall of heat has arrived. Like a thick syrup, it's encircling the city. On days like this, what always surprises me is how strongly I seem to suffer from weather amnesia. It's been 98 degrees before – many times before, even – but when I first feel that wretched miasma of heat and filth, it's a shock to my system. And after I've gotten used to the sweltering sun, I wrack my brain to try to remember what winter feels like, but I'm not able to summon it. Because it's so hot right now that walking outside is an extreme sport and the existence of another time or place is like an impossibility.

    Food in its simplest forms feels unthinkably frivolous when it's like this. I wake up and can barely muster the interest in a cup of tea. Lunch rolls around and I have to force myself to eat a piece of tofu and some greens. This is strange behavior for someone who can set a watch to her stomach growls, but the heat takes it all out of me.

    And yet.

    In a last-ditch effort to save myself from eating cereal with (cool, blessedly cool) milk for dinner, I plucked this Thai-style salad from the pile. The gravitation towards Southeast Asia couldn't have been much of a surprise – I don't know where you'd find more experts on hot-weather food. I wasn't lucky enough to get my hands on any of the Indian mangoes that finally came our way earlier this summer, but I substituted them with a few of those smooth, yellow-greenish, Haitian mangoes and promised myself that when I finally get around to going on that vacation in India I've been meaning to take for the past six years, I'll eat all the mangoes I can get.

    (Was anybody else so lucky as to try an Alphonso or Banganpalli or Kesar when they were being allowed into the country? Those names alone! I'm bewitched.)

    In any case, Haitian mangoes diced up and dressed with a fiery, sweet-sour dressing, then punctuated with salt-frosted peanuts, cooling leaves of mint, the appealing crunch of bean sprouts, and bright, tender shrimp is quite the hot-weather meal. You'll barely break a sweat preparing it and, more importantly, will feel entirely refreshed as you eat it. (And if you've got leftovers, roll them up in leaves of butter lettuce the next day for lunch. I won't be so lucky.)

    Fridge-cold and hot-sour-salty-sweet – this salad was relief and pleasure in one.

    Mango and Shrimp Salad
    Serves 4

    Dressing
    4 tablespoons fish sauce
    2 tablespoons brown sugar
    2 tablespoons honey
    4 tablespoons fresh lime juice (from about 2 to 3 large limes)
    2 cloves garlic, minced
    2 to 4 seeded and minced Thai chiles (or 1 to 3 serranos), to taste

    1. In a small saucepan, combine the fish sauce, sugar and honey. Heat over medium heat, stirring constantly, until the sugar and honey dissolve and the mixture is syrupy, about 1 minute.

    2. In a blender or food processor, combine the sweetened fish sauce syrup, lime juice, garlic and chiles, and blend for about 30 seconds to a minute. Set aside. Makes two-thirds cup.

    Mango salad and assembly
    1 pound (medium to large) raw shrimp
    5 to 6 large firm mangoes (about 8 ounces each), peeled, pitted and cut into medium dice
    1 cup bean sprouts
    2 tablespoons minced shallot (about 2 large)
    About 1/2 cup stemmed cilantro, plus more for garnish
    About 1/2 cup small mint leaves (if leaves are large, tear them in half), plus more for garnish
    2/3 cup dressing, divided, or to taste
    4 teaspoons chopped peanuts (unsalted) for garnish
    Lime wedges

    1. Peel and devein the shrimp under cold, running water. Bring a large saucepan of lightly salted water to a boil. Reduce the heat to a slow simmer and add the shrimp. Poach the shrimp until just cooked (they will be pink and firm, and opaque throughout), about 2 to 2 1/2 minutes. Drain the shrimp; place them in a bowl of ice water to stop the cooking. Drain the shrimp again; set aside in the refrigerator.

    2. In a large bowl, combine the mangoes, sprouts, shallot, cilantro and mint and set aside.

    3. Mix about one-half cup of the dressing, or to taste, with the reserved mango mixture. Mound the mango mixture on four chilled plates. Toss the shrimp with the remaining dressing to coat. Divide the shrimp evenly on top of each salad and sprinkle about 1 teaspoon peanuts on top of each plate. Garnish with sprigs of mint and cilantro. Add lime wedges to each plate.

  • P1100893

    I thought you might like to know that traps have been set and I am spending the day avoiding my apartment. Hoping that by the time I go home (after seeing yet more apartments, heavens above) and meet Ben (back, finally, from his trip so he can attend to his mouse-corpse-removal duties), there will be something for him to pick up gingerly and discard while I prance blithely about in the background, making pretend that life is nothing but a string of bowl-full-of-cherry days and that our greatest worry is whether we'll be eating lobster rolls at Pearl's or Ed's tonight. (For my birthday. Yes, the one that happened 6 months ago.)

    Though, admittedly, the exterminator removed all sense of guilt that I had over the offing of this little creature by turning to me at some point this morning while he was shoving poison packs under my cabinets, and I was wringing my hands, and barking out of the corner of his scornfully pursed lips:

    "Ya'd rather get the hantavirus? That stuff's incurable, ya know."

    Um, well, nothankyouverymuch. And with that I am ending all discussion of mouse talk and the vile diseases they spread, because, ugh, I can barely even see straight anymore for all the grossness and I can't handle another dead faint, not when I've left my smelling salts at home.

    Besides, in far more interesting news, I've got to tell you that homemade butter, the kind that isn't cultured and therefore still mostly tastes like Land O'Lakes sans the nasty supermarket flavor bloom, makes for excellent tart crusts.

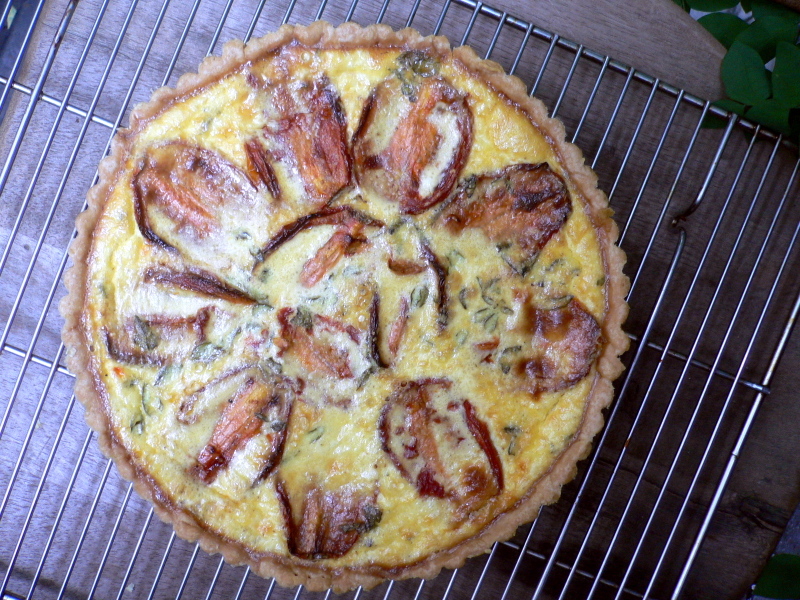
    Really, they're total perfection. At first, after the butter, flour and salt had whirred about in the food processor, I thought the dough looked too smooth and uniform, not pebbly enough. But chilled and rolled and pricked and parbaked and filled and baked again, the dough turned into this meltingly tender, delicious crust that held together well and melted in our mouths.

    Though I suppose I should also tell you that that tasty crust would have been nothing without a lining of grated farmhouse cheddar and a filling of roasted tomatoes suspended in a savory ricotta custard, infused with oregano leaves. The tart was airy and creamy and the silky tomatoes packed a wallop of concentrated flavor.

    I served this along with grill-blistered hot dogs and nicely charred hamburgers on Independence Day, before the rain came out and crowded us indoors, where we lined the walls of my narrow apartment, drinking beer, soothing babies, and discussing real estate (is there anything else we can talk about?). The tart disappeared long before the hot dogs did, which is saying something, since it seems that the Fourth of July is hardly even a holiday if there aren't hot dogs to be had. Wouldn't you say?

    So, yeah. Are you busy right now? Don't you think you should get yourself home to make this? I think you should, I really do.

    Tomato-Ricotta Tart
    Servings: 9 to 12

    Tart shell
    1 1/2 cups plus 2 tablespoons flour
    1/4 teaspoon salt
    1/2 cup plus 1 tablespoon cold unsalted butter, cut into 1-inch pieces, plus extra for greasing
    1 beaten egg yolk, divided (use half for the tart shell and reserve half for the filling)

    1. In a food processor, process the flour, salt and butter for about 5 to 8 seconds, so that some pieces of butter are left. Combine half of the egg yolk (saving the other half for the filling; set aside in the refrigerator) with one-fourth cup cold water and drizzle through the tube of the food processor while pulsing. Pulse until the dough forms a ball and pulls away from the sides.

    2. Alternatively, the dough can be mixed by hand. Put the flour and salt in a bowl, cut the butter into pieces and work it into the flour with your fingertips. Make a well in the middle of the flour and butter mixture and add the half egg yolk and one-quarter cup ice water. Stir quickly with a fork to start bringing the dry and wet ingredients together. When the fork can't do any more, use your hands just to bring the dough together. Don't knead or press — all you have to do is gather up the dry parts as quickly as possible. If your hands get too warm, put them under cold water for a few minutes.

    3. Wrap the dough in plastic wrap and chill in the refrigerator for at least 30 minutes, or up to 8 hours.

    4. Heat the oven to 350 degrees. Take the dough out of the refrigerator. Dust your work surface and rolling pin with flour and roll out the dough, lifting and turning it all the time so that it does not stick to the surface. Roll the dough out into a square about one-eighth-inch thick. Roll the dough around the rolling pin and gently lift it into the tart pan, gently pressing the dough into the bottom of the pan and up against the sides. Trim the edges. Chill again for about 30 minutes.

    5. Line the tart shell with parchment or foil and fill it with pie weights or beans and bake for 15 minutes. Remove the weights and the parchment or foil and prick the crust with a fork. Continue baking an additional 20 to 25 minutes until golden. Cool the tart shell on a rack.

    Cream mixture, filling and assembly
    6 plum tomatoes (such as Roma), halved
    Salt
    Freshly ground black pepper
    Olive oil
    1 cup half and half
    2 eggs
    1/2 egg yolk (reserved from making the tart shell)
    Pinch grated nutmeg
    1 tart shell
    1 cup packed grated farmhouse cheddar cheese
    3/4 cup ricotta cheese (I only used 1/2 cup, and I blended it in with the cream mixture)
    1/2 cup tender sprigs of fresh thyme or oregano

    1. Heat the oven to 350 degrees. Line a baking sheet with foil, place a rack in the baking sheet and roast the tomatoes skin-side up for about 2 hours, until the liquid has gone and the skins can be removed easily. Season the skinned tomatoes generously with salt and pepper and drizzle a little oil over them. Allow to cool to room temperature.

    2. In a mixing bowl, beat the half and half, eggs, egg yolk, one-fourth teaspoon salt and one-eighth teaspoon pepper and nutmeg until they are well mixed.

    3. Place the tart shell on a baking sheet and scatter the cheddar cheese over the base of the tart. Place the tomatoes on top of this and spoonfuls of ricotta in between the tomatoes.

    4. Pour in as much of the cream mixture as you can without it spilling over the top; you may have some cream mixture left over. Sprinkle with the thyme.

    5. Transfer carefully to the oven and bake for about 30 to 40 minutes until the filling has set and is lightly golden. Allow to cool slightly before serving.

  • P1100870

    These past few days have been my favorite kind of New York days. The air is crisp, odd for July, and the sun never gets too hot. The sky is a kind of piercing blue that we usually don't see until September and the puffy clouds floating across the heavens are as light and airy as marshmallows. At night, it's cool enough to pull a thin cardigan around my shoulders.

    The city empties out around holidays, which is always a treat. It's not that I don't like having my fellow New Yorkers around, but the calm that descends upon the city on a holiday is something that I'm loathe to share. The steady rumble from the streets dies down, the buzz of construction sites and the hum of air conditioners cease, and you can hear birds in Manhattan again.

    There's something kind of special about this other New York, the one that only those without summer shares and highway dreams have. When I pass the few people on my street who have stuck around as well, we smile at each other and nod. Usually, we don't even acknowledge each other's presence. But we're special now, we're in a club together – at home, in this city, on a holiday when everyone else has fled for clogged roads and beaches. The check-out girl at the supermarket where I've just bought five pounds of ground beef ignores me on most days, but today we're both having people over for a celebration, so she decides to share her mother's burger method with me and we share a conspiratorial smile.

    I don't care about fireworks and I'm doing my best to ignore the threat of a terror spectacular. This slowing down, this different pace, this is what the Fourth of July is all about for me. Trying not to break my rickety grill as we load it up with hot dogs and burgers, sipping a chilled beer with friends who've come from uptown, downtown, crosstown and Queens, (hoping that the mouse doesn't choose this particular moment to come out and play), introducing a little monkey named Charlotte to the pleasure of afternoon barbecue – this is how we'll be celebrating.

    As for the meatballs I'd so much looked forward to making, they were nothing more than just fine. Surprising, right? After all, you'd think that garlic oil and pancetta and red pepper flakes would have done quite a good job of perking up this rather pedestrian concept of a dish. Not to mention the tuna! But the meatballs were nothing special. You couldn't taste the pancetta (which never gets browned), the garlic was almost too faint to be noticed, and parsley was entirely the wrong herb to use alone here. The tomato sauce helped a good deal towards pepping them up, but I won't be making these again, not when there's Jamie Oliver's recipe for tuna meatballs that sounds like it will be far more satisfying.

    Wouldn't you agree? Happy Independence Day, everyone.

    Tuna Meatballs
    Serves 4

    3/4 cup bread cubes from stale baguette
    1/2 cup whole milk
    5 tablespoons extra virgin olive oil
    2 cloves garlic, thinly sliced
    1 1/2 pounds tuna, cut into 1-inch chunks
    2 ounces pancetta, finely diced (1/4 cup)
    1 large egg, lightly beaten
    1 tablespoon chopped flat-leaf parsley
    1/4 teaspoon red-pepper flakes
    Sea salt
    Freshly ground black pepper
    4 cups mild tomato sauce
    1 pound spaghetti

    1. Soak bread in milk in small bowl for 30 minutes. Place work bowl and blade of food processor in freezer.

    2. Heat 2 tablespoons of oil in medium pan over medium heat. Add garlic and stir occasionally until translucent, about 3 minutes. Set pan aside to cool.

    3. Squeeze bread to remove excess milk, put in chilled food processor bowl with tuna and pancetta. Pulse until just coarsely ground and combined. Refrigerate briefly. Add garlic and its oil, 2 tablespoons water, egg, parsley and red-pepper flakes. Season with 1/2 teaspoon salt and a few grindings of pepper. Lightly but thoroughly mix with hands.

    4. Make a small meatball and sauté in a bit of oil over medium-high heat to taste for seasoning. Adjusting seasonings if necessary.

    5. Heat sauce in a 6-quart pot over low heat.

    6. With moistened hands, form 20 meatballs, each about 1 3/4 inch in diameter (about 1 1/2 ounces). Heat remaining 3 tablespoons olive oil in pan on medium high until hot but not smoking. Cook meatballs in batches until well browned all around, 6 to 8 minutes. When done, transfer to sauce with slotted spoon. When all the meatballs are in sauce, partially cover pot and gently simmer for 1 hour, stirring carefully occasionally.

    7. Bring large pot of salted water to a boil and cook spaghetti until almost al dente. Drain and serve in bowl with sauce and meatballs spooned over.

  • P1100850

    Oh, readers. You are just the best. Can I count the ways your comments cheered me up this weekend? I cannot. They made me giggle and shudder and feel a lot less alone in the apartment. Thank you so much for all your help and sympathy – it was far better than the smelling salts I thought I'd have pressed to my nose all weekend in despair. A phone call made to the exterminator (who still hasn't shown up, by the way), watching Ratatouille, and spending a lot of time outside with friends also made me feel far more serene about the fuzzy interloper who knocked me sideways on Friday.

    I'll admit, I haven't bought traps just yet (I am a coward, that's all there is to it), because part of me is hoping that the little guy was scared stiff by my scream and is cowering in the walls until we move out in 29 days. Pretty please?

    (Oh God, that reminds me. 29 days and we still don't know where we're going. Perhaps a mouse-infested apartment is better than no apartment at all?)

    But I digress.

    Because, in other, far more important news, I spent the rest of the weekend basking in the warm glow of self-satisfaction. Pourquoi, you might ask? Well, ladies and gentlemen, I made my own butter. And let me tell you, there is absolutely nothing that is more astonishingly satisfying than that. Oh sure, baking your own bread certainly makes you feel all capable and strong and resourceful, even, but churning your own butter? It tops that, I swear.

    Daniel Patterson, he of the water-poached scrambled eggs, wrote about the glories of making your own butter in yesterday's New York Times Magazine. It all seemed rather serendipitous, because I'd been absolutely itching to make Melissa's cultured butter for days. If you didn't already know it, can I tell you how easy it is? It is so easy. So ridiculously easy.

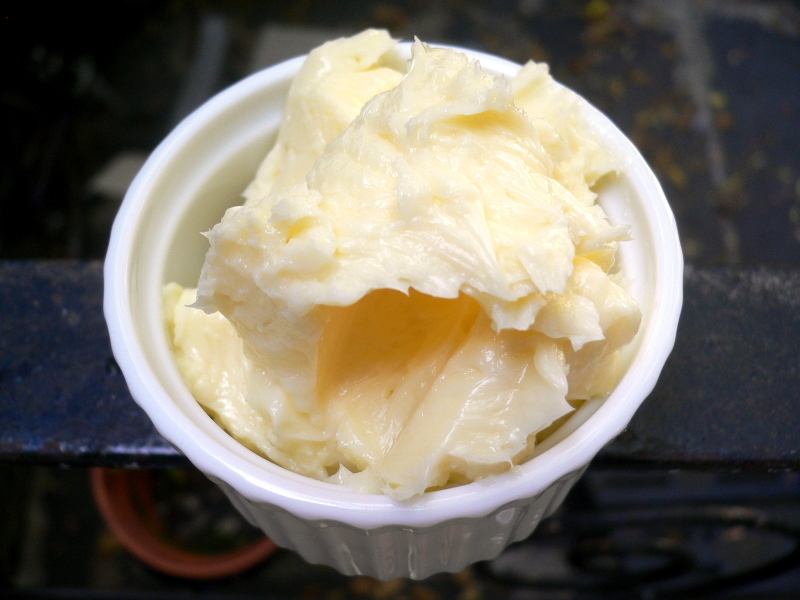
    You take some heavy cream (I used Ronnybrook's), whip it in a bowl for as long as it takes (around 8 minutes) to go from being liquid to whipped to curdled and then to butter. The little bits of butter float in a milky liquid: buttermilk. I always thought buttermilk was just sour and thick (totally delicious, I might add), but as Daniel describes, this stuff is sweet and somewhat watery. (His recipes for using the buttermilk sounded quite good, but I used my buttermilk to soak stale bread for tuna meatballs – finally, yes! The story on those later. This week, though. I promise.)

    I drained the buttermilk from the butter, then kneaded the butter in the strainer until it was silky and dense and most of the liquid had been squeezed out of it. I packed the butter in little ramekins and refrigerated it until it was firm but still spreadable.

    P1100847

    Spread thickly on a slice of raisin-oatmeal bread, it was a good afternoon snack. I'll be honest, the fact that I'd made that butter myself was largely why I was so enchanted with it. The butter was very mild, and tasted like the pure, clean version of the American butter widely available in supermarkets everywhere. It didn't have much of a flavor profile. I put a knife-tip of the butter on my tongue and could taste the sweet cream briefly, but the flavor evaporated in seconds. The mouthfeel was lovely – cold and creamy – but this wasn't the kind of butter I'd be excited to eat at a restaurant (or frankly, even for breakfast, because truthfully, I'm not really a butter girl, except when I'm in Berlin and can eat Lurpak on Schwarzbrot to my heart's content, though I did use it in the tomato sauce for the tuna meatballs, Marcella's famous one with butter and onion).

    So all of this means that later this week, I'll go back to the kitchen counter armed with another bottle of cream and a dollop of yogurt to try my hand at Melissa's recipe for cultured butter. I'm thinking that, on fire-roasted corn at our Fourth of July barbecue, it should taste pretty good, right?

    Homemade Butter
    Makes 16 ounces of butter

    6 cups organic heavy cream (I used one pint)
    Salt to taste (optional)

    1. Pour the cream into the bowl of an electric mixer fitted with a whisk. Tightly cover the top of the bowl with plastic wrap and start mixer on medium-high speed. The cream will go through the whipped stage, thicken further and then change color from off-white to pale yellow; this will take at least 5 to 8 minutes. When it starts to look pebbly, it’s almost done. After another minute the butter will separate, causing the liquid to splash against the plastic wrap. At this point stop the mixer.

    2. Set a strainer over a bowl. Pour the contents of the mixer into the strainer and let the buttermilk drain through. Strain the buttermilk again, this time through a fine-mesh sieve set over a small bowl; set aside.

    3. Keeping the butter in the strainer set over the first bowl, knead it to consolidate the remaining liquid and fat and expel the rest of the buttermilk. Knead until the texture is dense and creamy, about 5 minutes. Strain the excess liquid into the buttermilk. Refrigerate the buttermilk.

    4. Mix salt into the butter, if you want. Transfer to an airtight container and refrigerate.

  • The Management would like to inform its readers that the author of this blog will be, until further notice, incapacitated after seeing what is sometimes referred to as the "common" house mouse in her kitchen, though she adamantly insists there is nothing common about it. It is quite a miracle that she is now able enough to insist on such things, as her first reaction to the aforementioned mouse was to fall over in a dead faint and then bleat hysterically for several hours.

    Your regular content will resume as soon as the author can summon the strength to buy traps, bait them, and then remove them with the offending party captured therein. Any assistance in the removal of said traps would be desperately appreciated, as the man of the house is currently on what is often referred to as a "boys weekend" with his university companions and therefore cannot assist in this most gruesome of tasks.

    Please send strength and prayers. Oh, and an exterminator.

  • P1100825

    Instructions for a hot day:

    1. Go to a bar and have someone pour you a cold wheat beer. Drink it while beads of moisture collect on the glass, cooling the palms of your hand each time you take a sip. Sit in the window of the bar so you can see your fellow citizens pass by (incidentally, where do they find such cute sandals?). As you finish your beer, the knot of tension in your upper back will slowly disintegrate and you'll walk home in a pleasant fog.

    2. At home, find yourself the four smallest, firmest, freshest zucchini you can get your hands on. If you must pick them from a garden patch yourself, do so. Slice them lengthwise with a mandoline, if you've got the nerve, or a very sharp knife (I haven't used a mandoline since the Great Thumb-Slicing Incident of 1993, which I think still has my father traumatized, so let's hope this offhand mention doesn't incur some kind of PTSD in him. Stay cool, Pops.). Lengthwise, I said, not crosswise, like I did. Maybe you should wait a little before finishing your beer and then reading the recipe instructions. Definitely wait before using the mandoline.

    3. Dress the paper-thin zucchini slices with a lemon juice dressing and collapse on the couch, which is conveniently situated across from the air conditioner. Wait there until the beads of sweat on your brow and back and arms dry. Kill a millipede for the third time this week and thank your lucky stars to be vacating the apartment in a month. Open the door to the back patio and realize you only have a month to enjoy it. Find yourself torn between hatred for millipedes and love for your patio. Realize the Raid fumes might be getting to your head. Feel a twinge of embarrassment for killing a millipede with roach poison. Try to stop thinking about bugs altogether as they are killing your buzz and ruining your already miniscule appetite.

    4. Go back to the couch and sit there in the stream of cold air until goose bumps start to appear on your skin. During this time, you may a. read The New Yorker, b. watch an episode of Big Love, or c. try to imagine just exactly where you'd put the couch and hang the paintings in a two-bedroom dream apartment. Choice c. somehow ends up being the most entertaining.

    5. When you have tired of your virtual interior decorator, peel and thinly slice an avocado. Attempt to layer avocado slices along with the marinated zucchini slices on a plate. Artistically, if you may. Drizzle the dressing over the vegetables, then pluck little leaves of thyme off the stalk and drop them around the plate. Realize you don't have any pistachios. Briefly contemplate using salted peanuts. Decide against it. Beer hasn't incapacitated you that much. Sufficiently chilled from your wind-powered air conditioner, go out on the patio and eat your salad.

    6. Realize happily that raw zucchini are quite delicious, in a subtle, grassy way. With the faint crunch of sliced zucchini against the creamy avocado, punctuated by the herbal thyme, the salad is cooling and delicate and lovely. Think about when you lived down the street from Patricia Wells in Paris and how you used to dream about doing her dinner party dishes in return for cooking classes in Provence. Remember all the one-plate meals you ate in your little studio there, and how lonely you were, which makes you realize just how un-lonely you currently feel. Finish your delicate little dinner and sit in the heat for a few minutes longer. The air-conditioner can wait.

    Zucchini Carpaccio with Avocado
    Serves 4

    1 tablespoon freshly squeezed lemon juice
    1/2 teaspoon fine sea salt, plus additional as needed
    1/4 cup best-quality pistachio oil, almond oil or extra virgin olive oil
    4 small zucchini (about 4 ounces each), trimmed
    1 ripe avocado, peeled and very thinly sliced
    1/4 cup salted pistachio nuts
    4 sprigs fresh lemon thyme, preferably with flowers

    1. Stir together lemon juice and  1/2 teaspoon salt in small jar. Add oil, cover  and shake to blend.

    2. Slice zucchini lengthwise as thinly as possible, using mandoline or very sharp knife. Spread slices on platter and drizzle with lemon mixture. Tilt platter to evenly coat slices. Cover with plastic wrap and marinate at room temperature for 30 minutes to an hour.

    3. Alternate zucchini and avocado slices on individual salad plates, slightly overlapping each slice. Sprinkle with pistachio nuts. Season with salt to taste, garnish with lemon thyme, and serve

  • P1100817

    (Oh dear. This is awkward. I think I'm going to write this entire post in parentheses. You know, to mitigate the awkwardness. If it's in parentheses, then it's still sort of just a thought in my head and not an entirely un-take-back-able statement. Right? I don't know. Lord help me.)

    (So here's what happened. Last week, Russ Parsons published this article in the Los Angeles Times about waffles. Goodness knows we are a wafflefriendly household. And since there is no other waffle more talked about than Marion Cunningham's yeast-raised waffle (am I wrong?), I was quite excited to try my hand at this legendary recipe.)

    (You make a batter with active dry yeast and let it ferment overnight in the fridge. But I didn't get started until early Sunday morning – on Saturday, we were too busy looking at apartments out in faraway neighborhoods and getting into arguments about where we should live and how much we should pay and, oh, the joys of New York City living, they really are such a pleasure – so I let the batter ferment on my kitchen counter top for an hour or two instead. It doubled in size and smelled deliciously yeasty and had all these appealing bubbles and a gorgeous foamy top. Very promising, indeed – as was that one place out in Forest Hills, the one I can't stop thinking about and, holy hell, does that mean we should take it, help me, readers, help me.)

    (I heated up the waffle iron and we debated the merits of Bak-Kleene versus melted butter, but it turned out that neither was really that necessary. My non-stick waffle iron performed like a champ, spitting out waffles with nary a sticking corner in sight. It was impressive. Less impressive, however, were (gulp, double gulp) the waffles.)

    (Did I actually just say that out loud?)

    (…)

    (For starters, the waffles, while crisp and browned on the bottom, were flabby and a pallid, yellowish hue on top. Also, their insides were a little too batter-y. And lastly, they were buttery to the point of greasiness.)

    (We ate the first round in silence, chewing carefully. Ben tentatively ventured that they might not be the best waffles we'd ever made. With the second round, I tried flipping the waffles in the iron in the hopes that the pale, yellow side might get a little toastier. Hardly. With the third and fourth batch, I overfilled the iron, which resulted in the delicate lacy waffle you see in the photograph. The underside, however, still looked totally under-baked. The taste was better now, though, and Ben made the good point that the warm syrup-doused waffles tasted like French toast – it must have been the yeast, I think. I still found them far too buttery for my taste. Unpleasantly heavy, they sat in my stomach while I pondered the impossible.)

    (Could it be that I didn't like the world's most beloved waffle? Would anyone still take me seriously after this? What on earth would become of me?)

    (It's not really clear. We spent the rest of the day calculating rent budgets and train passes, imagining life in a spacious 2-bedroom apartment with leafy tree-tops instead of air shafts for a view, and weekends spent strolling down the West Side Highway. Which made me think – if there's room in this city for all the different folks we saw out yesterday, there must also be room for li'l ol' yeasted-waffle-disliking me. Right? Oh, pretty please!)

    Yeast-Raised Waffles
    Makes 16 waffles

    1 package active dry yeast
    2 cups milk
    1/2 cup (1 stick) butter, melted
    1 teaspoon salt
    1 teaspoon sugar
    2 cups flour
    2 eggs
    1/4 teaspoon baking soda

    1. Place one-half cup warm water in a large mixing bowl (the batter will double in volume) and sprinkle in the yeast. When dissolved, stir in the milk, butter, salt, sugar, flour and eggs and beat until smooth and blended. Cover the bowl with plastic wrap and refrigerate overnight.

    2. Just before cooking the waffles, beat in the baking soda. The batter will deflate and become about as thin as soft yogurt. Cook the waffles according to the manufacturer's instructions for your waffle maker. Serve with maple syrup.

  • P1100757

    Nostalgia for the Italian countryside is all well and good, but some things can happen only in New York.

    Consider this: walking down 17th Street at dusk last night, I saw a group of people clustered in front of a rug store. As I got closer, I heard strains of choral music and before I knew it, I was standing in the gutter in front of The Renaissance Street Singers, listening to a 15th century hymnal as pretty young things in bright frocks passed us by and a toddler noodled around on the sidewalk. I'd come from Union Square, populated by  21st century skateboarders and leggy models and red-faced suits, and passed directly into another time. A few minutes later, the singers dispersed and I headed home in the setting sun.

    It was kind of magical.

    All week long, I've been waking early in the morning, still adjusting to Eastern Standard Time. And each morning, I've rolled over and reached for a slim little book sitting on my bedside table. Edited by Jenni Ferrari-Adler (who was kind enough to send me a copy), it's a collection of essays about eating and cooking for one. Sandwiched between Laurie Colwin's famous "Alone in the Kitchen with an Eggplant" and Rosa Jurjevics's "Food Nomad" (Jurjevics is Colwin's daughter), the essays range from the strictly utilitarian (Marcella Hazan) to the unabashedly literary (Haruki Murakami).

    The collection's pretty charming: M.F.K. Fisher complains about her too-oft reliance on the "occasional egg" for dinner, Steve Almond waxes rhapsodic about an odd concoction called the Quesarito and Mary Cantwell fights for her right to dine out alone. Each essay is a pleasantly voyeuristic snapshot, like looking into someone's grocery basket. And it got me thinking about my own habits when I'm home alone, looking for dinner. Sometimes it means I get to buy the stingingly spicy hot & sour soup from the Sichuan restaurant up the street. Other times, it means I can make the sauteed cherry tomato-canned tuna pasta sauce that Ben just doesn't like. A simple green salad and a wedge of cheese, a broiled steak, or baked beans and broccoli – all of these, too, are my dinners for one.

    Last night, inspired by your comments and armed with a recipe that Judy Rodgers published in the New York Times five years ago, I made a funny little salad of spiky mizuna leaves, creamy potatoes, sharp slivers of shallots, boiled eggs, and a tangy dressing to bind it all together. I'll be honest, this wasn't my favorite meal. The mizuna was full-grown and untameable, so even cut into bite-sized pieces, I found myself fighting the leaves all the way. I think I'm more of a frisee kind of girl. Also, raw shallots leave me interminably thirsty. Anyone else? It's so odd. I prefer to avoid them.

    But, you know, despite the salad, it was a satisfying evening nonetheless. Sometimes it's just the little things. I had the apartment to myself, I was eating up the greens in my CSA box, clearing the pantry of old shallots and even older potatoes, I could giggle with my mouth full at The Office reruns, and daydream happily for the weekend. I had dinner on the table and a full sensation in my soul.

    And you? Tell me what you make when you're home alone with an eggplant, or without. I'd love to know. Something tells me you've got some interesting meals to share.

    Baby Mustard Greens with Potatoes and Shallot Vinaigrette
    Serves 4

    3/8 pound Yellow Finn, Bintje or German butterball potatoes, peeled and cut in irregular bite-size chunks
    Sea salt
    6 1/2 tablespoons extra-virgin olive oil
    2 tablespoons Champagne or white wine vinegar
    1 large shallot, slivered
    4 ounces baby red mustard greens or mizuna, rinsed and dried
    2 hard-cooked eggs, peeled
    1 teaspoon freshly crushed black peppercorns

    1. Place potatoes in a saucepan with cold water to cover. Season water liberally with salt. Bring to a simmer, cook just until potatoes are tender, 6 to 8 minutes, then drain. When potatoes stop steaming, transfer them to a wide bowl.

    2. Combine oil, vinegar and salt to taste, and drizzle about one-third of this dressing over potatoes. Add shallot. Fold together with a rubber spatula. Dressing will pick up creaminess from potatoes. Set aside.

    3. Place mustard greens or mizuna in a second wide bowl suitable for serving. Toss with half of the remaining dressing. Add potato mixture, and fold in gently. Halve eggs lengthwise, then cut in crosswise slices  1/8-inch thick. Scatter over salad, add remaining dressing, and fold once or twice very gently. Dust with crushed pepper, and serve.

  • P1100745

    Things that have made me happy in the past few days:

    1. Molly Stevens’ book about braising, which I’d requested from the library, oh, six months ago, was finally released to me this week. (Granted, in June hot June, so the idea of braising seems entirely perverted at this moment, but still! I can ogle the book and that’s enough.)

    2. My CSA started deliveries again, so I now have bok choy, mizuna (help, readers, help!) and summer savory sitting in my fridge. Red sails lettuce was my dinner last night. Do you belong to a CSA yet? Get cracking! (Last night I heard talk of some mythical-sounding CSA not far from here that not only delivers vegetables, but fruit and yogurt and honey, too! I’m on the case.)

    3. I made bagels.

    What?

    Yes! You heard that correctly! You might ask yourself what on earth could possess a self-respecting New Yorker like myself to make her own bagels, when she has plenty of worthy, nay, superior specimens all around her. And I would answer, this blog, that’s what. I mean, what kind of question is that, anyway?

    Susan LaTempa
    discovered these unboiled bagels in California while I was away, making me as intrigued as she was. After all, I’ve always wanted to make my own bagels, but the aforementioned ubiquity of good ones here and the fact that making your own involves boiling and baking and malt syrup and god knows what else just discouraged me in the end.

    But not this time.

    I brought home a sack of Gold Medal’s new Harvest King flour (endorsed on the back by none other than Rose Levy Beranbaum), pulled my instant yeast out of the fridge (I’ll be honest, since No-Knead, it’s been sitting rather dormant there), stuck the dough blade into my food processor, and got to work.

    My first observation? This recipe makes what seems like an enormous amount of dough. If you’ve got a stand mixer, bless your heart, then use it. My Robot Coupe is a hardy fellow and managed with the dough, but I’ll admit we had a few dicey moments. With stalled motors and funny smells and other frightening stuff.

    My second observation? Making bagels is easy, folks. Really. You bang the dough together in a matter of minutes, let it rise (and, oh, does it rise. I love instant yeast), punch it down (best part of the process, really) and form it into bagels. That’s it! I picked up my farm loot and caught up on Big Love in the process.

    And as for the results, I was pleasantly surprised. The bagels have an appealing chew to them, a nice crunchy bottom and a good crumb. They don’t have the heft of traditional boiled bagels and lack that toasty flavor that only malt can supply, but they are pretty delicious for what they are. Plus, they’ll impress the heck out of most people you’ll serve them to. Spread with cream cheese or a little butter, they might even comfort a homesick New Yorker, stuck in foreign lands.

    I’ll be spreading mine with my mother’s sour cherry jam – my own Italian-American version of breakfast this morning.

    (Oh, and don’t forget the poppy or sesame seeds – sprinkle them on after the egg wash. I wish I had.)

    Bagels
    Makes 12 bagels

    6 tablespoons sugar
    1 1/2 teaspoons vegetable oil
    2 1/4 pounds (between 7 1/2 and 9 cups) bread flour, divided, plus additional if needed to work with dough
    2 1/4 teaspoons instant yeast
    1 teaspoon salt
    1 egg

    1. In as stand mixer fitted with
    the dough hook attachment, combine 3 cups water with the sugar,
    vegetable oil and 3 cups of the flour. Mix it at low speed until
    combined.

    2. Add the yeast and another 3 cups flour and continue to knead the dough at low speed until all of the flour has been incorporated.

    3. Add the salt and
    the remaining flour. Knead the dough at medium speed until it’s soft
    and smooth and it comes away from the sides of the bowl. If the dough
    is sticky add 1 tablespoon of flour at a time, until smooth and no
    longer sticky.

    4. Roll the dough into a ball.
    Place the dough in a lightly greased bowl, cover with a lightweight
    cloth or loosely with plastic wrap. Leave the dough for about 30
    minutes to 1 hour, depending on room temperature, until it doubles in
    volume.

    5. Punch down the dough. On a lightly
    floured surface, divide the dough into 12 even balls. (If dough is
    reverting when shaping, let it rest for a minute and start the process
    again.) To keep the dough from drying out, place a damp towel on top.

    6. Roll each ball to about 15 inches in length. Press and roll the ends together to form a bagel.

    7. Heat the oven to
    425 degrees. Place 4 to 6 bagels on a parchment-lined cookie sheet,
    leaving 1 to 1 1/2 inches between each bagel as they will spread. Cover
    the bagels with a cloth. Allow them to grow by half again in size,
    about 15 minutes. They should be light and fluffy. Widen the holes in
    the bagels to 1 1/2 inches each, as they will shrink while baking.

    8. In a small bowl, beat the eggs, then brush bagels with the egg wash. Bake until golden, about 20 to 22 minutes.

  • P1100543_2

    It's always so difficult, isn't it? To find yourself on the wrong end of a holiday, trying desperately to remember the sight and texture of everything that had been in front of you just hours before: the glint of sun on the acacia leaves, the tiny lizard shimmying along the terracotta patio, the sweet-smelling breeze brushing up against your skin, salty from a morning at the beach.

    On the drive to the train station yesterday morning, I told myself sternly to memorize every bump in the road, every burnished field we passed, every not-yet-entirely-unfurled sunflower head, every quiet farm stand selling peaches, every putt-putting motorcycle, every touch from my mother's hand. Like pearls on a broken string, I can feel the sensation of these things falling away in little pops. It's funny what distance does – makes everything you had so clearly in front of you turn blurry. Sharp edges turn soft, warmth fades to cool, the storm that is love and grief at taking leave becomes a gentle lump somewhere in your chest that you try your best to ignore.

    I sat in my bed this morning, the window pulled open and New York City trucks rattling the frame as they drove by. Suddenly, a whiff of linden blossoms blew in, the very smell that had been hanging in the air all week in Italy. There I sat, very much in one place, when the scent of another came in. I closed my eyes and took a deep breath. I could see my grandfather sitting on the top stoop of his house in his slippers, my mother with the garden hose by the roses, my aunt waving from the gate, the tree tops rippling in the wind. Then I breathed out and they were gone.

    Sometimes, I wonder at my life. Is this how it will always be? Being in one place and wanting another, not knowing how to accept that a body cannot be divided and sent in diverging directions. Here and there, near and far. I think I am lucky to have both.

    P1100310_2

    Lucky, too, to have spent a week eating milky-sweet ricotta, firm cherries from the orchard, stewy roast peppers with four generations of my family at the dinner table, boozy pistachio gelato in Urbino's main piazza before a warm afternoon thunderstorm, flaky crescia sfogliata filled with stewed chard after a few diligent hours in the Ducal palace, drippy, sun-warmed melons on the back patio.

    And with Ben's brother-in-law joining my aunt in the kitchen at times, we had paella and flan as well. Lucky us, indeed. One night, after a Marchigianian feast of homemade tagliatelle with pigeon ragu, tomatoes stuffed with wild fennel-scented bread crumbs, and rosemary-roasted rabbit, Francisco brought out his abuela Margarita's flan, eggy and cool and spiced just so with cinnamon and lemon. We ate slices of it, sauced with gently bitter caramel, under the starry night sky.

    Though all good things, maddeningly, must come to an end, at least the clothes in our suitcase still smell of the herbs my mother cut from my grandfather's garden, a jar of our neighbor's acacia honey fills my kitchen with sunshine, 903 photographs from the last ten days clog my computer and I've got a few prized recipes to recreate in my own kitchen. Best of all, when I close my eyes, I can still see red poppies lining the road and feel my mother hug me tightly. That'll have to do until next time. Which can't come soon enough. 

    Flan
    Serves 10-12

    200 grams of granulated sugar, plus 5 tablespoons
    1/2 liter of milk (whole is preferred, but 1% works)
    1 organic lemon
    1 cinnamon stick
    4 eggs

    1. Preheat the oven to 350 degrees. Sprinkle 5 tablespoons of sugar at the bottom of a cake pan, and add a judicious squeeze of lemon juice. Place the pan over medium heat and swirl the pan occasionally, until the sugar melts and then caramelizes. Let the sugar turn a deep brown, then turn off the heat. Don't let the sugar burn, but do let it color substantially. Set aside

    2. Heat the milk in a heavy saucepan with a 1-inch piece of lemon peel and the cinnamon stick. When the milk comes to a boil, turn off the heat and let the milk sit for a few minutes. While the milk is steeping, whisk together the eggs and the remaining sugar until the mixture is frothy and pale.

    3. Discard the lemon peel and cinnamon stick and very slowly pour a thin stream of hot milk into the beaten egg mixture, taking care not to let the eggs curdle. When the milk has been entirely incorporated into the eggs, pour the custard through a strainer into the caramel-lined pan. Place the pan carefully on a rimmed cookie sheet. Pour water into the cookie sheet until it reaches halfway up the sides of the cake pan.

    4. Put the pan in the hot oven and bake for an hour, or until the top of the custard is burnished and the custard has set. (A cake tester inserted into the custard should come out clean.) Carefully remove the cake pan from the cookie sheet and let it cool on a rack. When the custard has cooled, store the pan in the fridge. Before serving, place a large plate over the cake pan, then flip the pan so that the caramel is on top of the custard. Cut into wedges and serve.